Understanding Bird Tarantula Pictures
Bird tarantula pictures are a captivating genre of photography, blending the beauty of wildlife with the technical skill of capturing stunning images. These photographs provide a window into the often-hidden world of these fascinating creatures. Understanding the subject is the first step to taking amazing pictures. These spiders, despite their intimidating size, are relatively harmless to humans, making them safer to photograph than many other dangerous wildlife species. Bird tarantulas, despite their name, rarely eat birds. They are opportunistic hunters, feeding primarily on insects and other invertebrates. The allure of bird tarantula pictures stems from the combination of aesthetic appeal and educational value. They serve as a way to appreciate the intricate details of nature and to dispel some of the common misconceptions about spiders. Photography can also promote conservation efforts by raising awareness about these animals and their habitats.
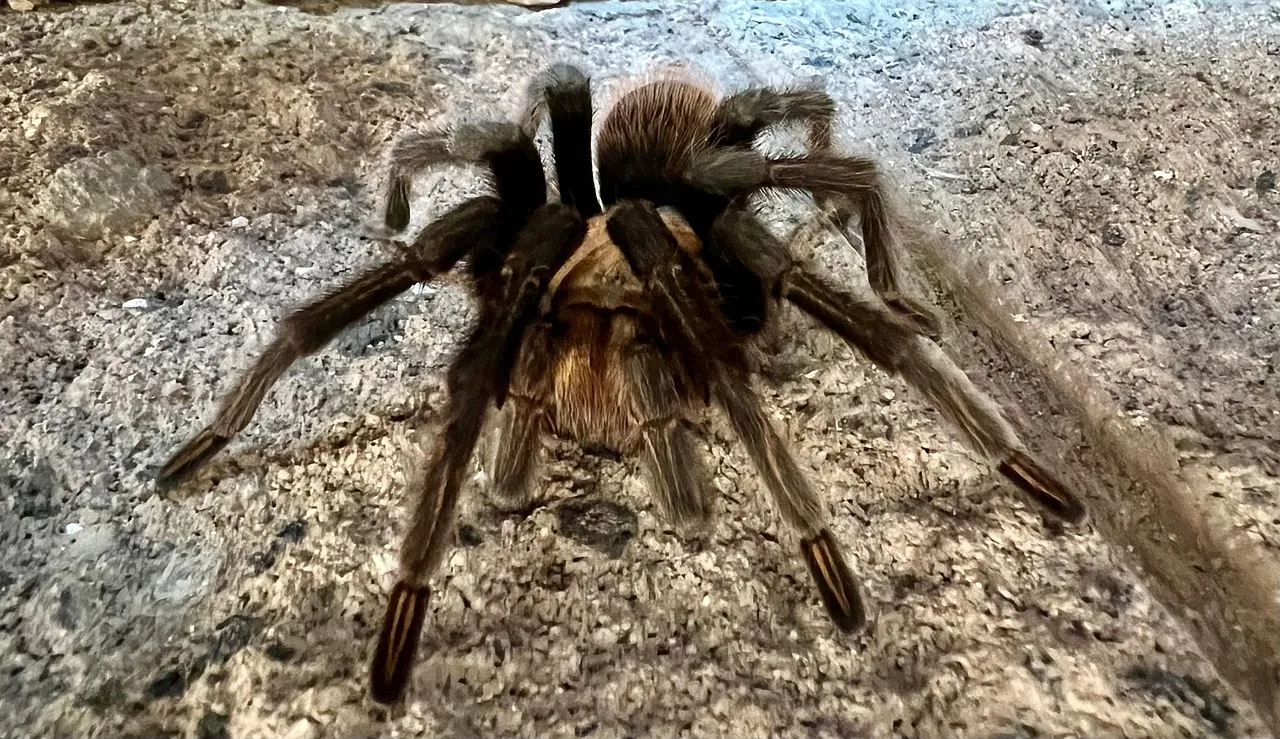
What are Bird Tarantulas
Bird tarantulas belong to the Theraphosidae family, a group of large and hairy spiders. They are found in various tropical and subtropical regions around the world, including South America, Central America, and parts of Asia. These spiders are known for their size, with some species having leg spans that can exceed 10 inches. Their bodies are covered in dense hairs, which serve various purposes, including sensory perception and defense. Despite their fearsome appearance, bird tarantulas are generally docile and not prone to biting unless provoked. They have a venomous bite, but it is typically not life-threatening to humans. They are primarily nocturnal hunters, using their fangs to inject venom into their prey. Understanding their behavior and environment is essential for successful photography. They often live in burrows or under rocks, and their activity levels can vary depending on the time of day, the weather, and the stage of their life cycle.
Why Photograph Bird Tarantulas

Photographing bird tarantulas is a rewarding pursuit for several reasons. First, it allows you to capture the beauty and intricate details of these fascinating creatures, from their hairy bodies to their powerful fangs. The art of photography challenges the photographer to showcase these details. Second, it offers an opportunity to develop your technical photography skills. Photographing tarantulas, especially in their natural habitats, requires mastering various techniques, including macro photography, lighting, and composition. Third, it helps to raise awareness and appreciation for these often-misunderstood animals. By sharing your photos, you can educate others about tarantulas and contribute to their conservation. Fourth, it’s an opportunity to connect with nature on a deeper level, observing the behaviors of these spiders and their interactions with their environment. Finally, it is an activity that offers unique challenges and great rewards, providing a sense of accomplishment. It allows photographers to push the boundaries of the creative and technical skills.
Essential Equipment for Bird Tarantula Photography
The right equipment is essential for capturing high-quality bird tarantula pictures. A camera capable of macro photography is the most crucial piece of equipment. This could be a DSLR, mirrorless camera, or a dedicated macro lens. These lenses allow you to focus very closely on your subject, revealing intricate details. A macro lens with a focal length of 100mm or greater is often ideal because it provides a comfortable working distance from the tarantula, minimizing the risk of disturbing it. Another important piece of equipment is a sturdy tripod, which is essential for maintaining sharpness, especially in low-light conditions. Choose a tripod that can handle the weight of your camera and lens and that allows for precise adjustments to the camera’s position. If you are taking photos outdoors, consider bringing a portable light source, such as a flash unit or LED panel. This will allow you to control the lighting and illuminate the tarantula effectively.
Camera and Lens Selection
When choosing a camera, consider the sensor size, resolution, and low-light performance. Full-frame cameras generally offer better image quality and low-light capabilities, but crop sensor cameras can be a more affordable option. The resolution of the camera determines the level of detail you can capture. A higher resolution allows for more cropping and flexibility in post-processing. The lens is just as important as the camera body. A dedicated macro lens is essential for capturing close-up shots of bird tarantulas. Choose a lens with a focal length of at least 90mm or 100mm to provide enough working distance and depth of field. Consider the lens aperture (f-number) – a lower f-number (e.g., f/2.8) will allow more light to enter the lens, which is great for low-light situations, and create a shallow depth of field.
Tripod and Stabilization

A tripod is crucial for macro photography of bird tarantulas. Macro photography requires a lot of focus and precision, and a tripod helps to keep the camera stable and sharp. Choose a tripod that is sturdy and has adjustable legs and a center column for flexibility. A ball head or a three-way head can be used to mount the camera on the tripod. Consider using a remote shutter release or the camera’s self-timer to avoid camera shake when taking photos. Stabilization systems, such as image stabilization (IS) or vibration reduction (VR) in your lens, can also help reduce camera shake. These systems compensate for minor movements, which is useful when handholding your camera in low-light situations. Using a tripod along with these systems is helpful to ensure sharpness.
Lighting Techniques for Bird Tarantula Pictures
Lighting plays a crucial role in bird tarantula photography. Proper lighting can bring out the colors, textures, and details of these spiders, while also creating the desired mood and atmosphere in your photos. There are two main types of lighting used in photography: natural and artificial. The best lighting depends on the location and the specific shot that you are aiming for.
Natural Light Photography
Natural light is often the preferred choice for outdoor photography. It creates soft, even lighting and beautiful colors. When using natural light, the best time to photograph is during the golden hours – the hour after sunrise and the hour before sunset – because the light is soft and warm, creating a flattering glow. Position the tarantula so that it is facing the sun. If the light is too harsh, use a diffuser to soften the light and reduce shadows. Overcast days can also provide excellent natural light. The clouds act as a natural diffuser, creating soft, even lighting that is perfect for macro photography. Be aware of the direction of the light and how it affects the shadows and highlights in your photos. Try to experiment with different angles to see what produces the best results.
Artificial Light Photography

Artificial light, such as flash units or LED panels, can be used to control lighting in various situations. Flash photography is particularly useful in low-light conditions or when you need to freeze the motion of the tarantula. Use a flash diffuser to soften the light and reduce harsh shadows. Experiment with different flash angles to create interesting lighting effects. When using artificial light, be mindful of the tarantula’s sensitivity to light. Avoid using a flash directly at the spider’s eyes, as it can be uncomfortable. Consider using a continuous light source, such as an LED panel. These panels provide consistent lighting and allow you to see the effects of the light before taking the photo. Diffusers are still useful for softening the light. The use of artificial lighting gives photographers more control over the final image.
Mastering Composition in Bird Tarantula Pictures
Composition is the art of arranging the elements within your photograph to create a visually appealing and effective image. Good composition draws the viewer’s eye to the subject and tells a story. With bird tarantula pictures, effective composition can highlight the unique characteristics of these creatures and create engaging images. The key elements of composition are framing, perspective, focus, depth of field, and the use of lines and patterns. Practice the rule of thirds by dividing your frame into nine equal parts with two horizontal and two vertical lines. Place your subject at the intersection of these lines or along the lines themselves. This creates a balanced and visually appealing composition. Use leading lines, such as the spider’s legs or the lines of its habitat, to guide the viewer’s eye through the image. Pay attention to the negative space around the spider, which can help to create a sense of balance and draw attention to the subject.
Framing and Perspective
Framing involves using elements in your scene to surround or enclose the subject, which draws attention to the subject and adds depth. Look for natural frames, such as leaves, branches, or rocks, to frame the tarantula. Perspective refers to the angle from which you shoot. Experiment with different perspectives to find the most interesting and flattering angle. Get down to the spider’s level to create a more intimate and engaging image. Close-up shots emphasize details, while wider shots show the spider in its habitat.
Focus and Depth of Field

Accurate focus is essential for sharp and detailed bird tarantula pictures. Use a macro lens and manual focus mode to achieve precise focus. When using manual focus, use the camera’s live view feature and zoom in on the subject to ensure accurate focus. Adjust the depth of field to control the area of the image that is in focus. A shallow depth of field can blur the background, which is useful for isolating the spider and drawing attention to it. A deeper depth of field ensures that more of the scene is in focus.
Capturing Action Shots
Capturing action shots of bird tarantulas can be a challenging but rewarding experience. Action shots can show the tarantula’s behavior, such as hunting, feeding, or molting. To capture action shots, set your camera to continuous shooting mode and increase the shutter speed to freeze the motion. Use a fast shutter speed to capture sharp images. Ensure that the lighting is adequate to freeze the motion. Pre-focus on the area where you anticipate the action to occur. This will help you capture sharp images of the tarantula as it moves. Be prepared to take many photos. Action shots are often unpredictable, so taking multiple shots increases your chances of capturing the perfect moment.
Photographing Molting
Molting is a unique process in which the tarantula sheds its exoskeleton. This can be an amazing photo opportunity. Molting can be a slow process, so be prepared to spend some time observing and photographing the tarantula. The tarantula will be vulnerable during molting, so avoid disturbing it. When the tarantula is molting, set your camera to a low ISO setting to minimize noise. Use a tripod to ensure sharpness, and experiment with different angles to capture the event from the best perspectives.
Photographing Feeding

Photographing a bird tarantula feeding can produce dramatic and captivating images. It’s a way to showcase the predator nature of the spider. When the tarantula is feeding, focus on the key elements, such as the tarantula, its prey, and the interaction between them. Adjust your lighting to highlight the action. Use a fast shutter speed to freeze the action, and focus on the action of eating. Get close to the action, but maintain a safe distance. Be prepared to capture the image quickly. Feeding is a fast process, and you may only have a few seconds to get the perfect shot.
Post-Processing Bird Tarantula Pictures
Post-processing is an essential step in enhancing your bird tarantula pictures and bringing out their full potential. Post-processing involves editing your photos using software such as Adobe Lightroom or Photoshop. The main purpose of post-processing is to adjust the exposure, contrast, colors, and details to optimize the image and create a polished final product. Always start with the basics, like adjusting the exposure to brighten or darken the image. Then, adjust the contrast to create more depth and definition in the image. Color correction is another critical aspect of post-processing. Adjust the white balance to ensure that the colors are accurate and true to life. Enhance the colors by adjusting the saturation and vibrance, or by using color grading tools to create a specific mood. Focus on details and texture. Use sharpening tools to bring out the fine details in the tarantula’s body and the surrounding environment.
Editing Software
Choosing the right editing software is an important part of the post-processing workflow. Adobe Lightroom and Photoshop are popular choices. Lightroom is an excellent option for organizing and editing photos. Photoshop offers more advanced editing capabilities. GIMP and Darktable are free, open-source alternatives to Photoshop and Lightroom, which can be used for basic editing and post-processing tasks. Experiment with different software and find one that suits your skill level and workflow. Use the software to make basic adjustments such as exposure, contrast, and white balance. Most software offers a range of tools for color correction, which include adjusting individual color channels or using color grading tools to change the overall look of your images.
Enhancing Colors and Details

Enhancing colors and details can transform your bird tarantula pictures. Adjust the saturation and vibrance to make the colors more vibrant and realistic. Use the sharpening tool to bring out the details, such as the hairs on the spider’s body. Reduce noise in the image to make it look cleaner and more detailed. Use masking tools to selectively adjust certain parts of the image. For example, you can use a mask to brighten the spider’s eyes or to darken the background to make the spider stand out. Always apply edits in moderation. Over-editing can make your photos look artificial, so it’s important to strike a balance between enhancing the image and preserving its natural appearance.
Sharing Your Bird Tarantula Pictures
Sharing your bird tarantula pictures is an excellent way to showcase your work, connect with other photographers, and educate others about these fascinating creatures. There are many platforms to share your work. Consider using social media platforms such as Instagram and Facebook. These platforms offer a wide audience and are great for sharing photos and connecting with other photographers. Join online photography communities. There are many online forums and groups dedicated to photography. Participate in competitions and exhibitions to gain exposure and recognition for your work. Consider creating a website or blog to showcase your photos and share your knowledge about bird tarantula photography. When sharing your photos, include relevant hashtags and descriptions to help people find them. Engage with other photographers and respond to comments and questions. Be sure to give credit to other photographers. Respect the copyright and privacy of others.
Online Platforms and Communities
Explore online platforms that cater to photography. Flickr and 500px are popular platforms for photographers. These platforms provide tools for sharing your photos, connecting with other photographers, and getting feedback on your work. Join photography communities, such as forums and groups, where you can share your photos, ask questions, and learn from other photographers. Use social media platforms effectively. Instagram and Facebook are great for showcasing your work and connecting with a broader audience. Use relevant hashtags to increase the visibility of your photos. Engage with your audience by responding to comments and questions. Share your photos in a way that reflects your personal style. Experiment with different styles, and find out what works best for you. Share your knowledge and experiences about bird tarantula pictures, and inspire others to take up photography.